Let Them Eat Cake!: Karen's Cake


I had already asked my dear neighbor Wendy Remer, an amazing chocolatier, to make a cake for my friend's 50th birthday celebration.  Then we saw the latest issue of Martha Stewart Weddings...


...and were inspired by the wonderful creations of Nan Deluca, Patricia Mumau, Dana Cochran, and Xandra Zamora. We decided to collaborate and create something unique for the occasion.

Having admired the work, and especially the mandalas, of Jane Farr, I was delighted to find her outstanding step-by-step instructions for creating them.  I penned my first mandala around the initial "K", then headed to Fedex Kinko's (or whatever it's called this week) to make a few enlargements.

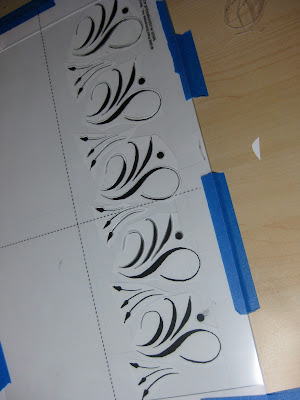
With luck (and a 40% off coupon) I found an electric stencil cutter at Michaels--I didn't even know such a thing existed!  What a dream to work with!  It's kind of like a woodburning tool with a very fine tip.  It seems to work well on .003 and thicker acetate sheets, as well as the stencil blanks that are sold for this purpose.


I taped the design to my work table, then a piece of glass over that, and the blank stencil on top.  With a little practice I was able to keep the tool moving smoothly enough.  (I did have my husband improve the insulation, though--it gets very hot!).


The pieces popped out easily with a craft knife.


I set the stencil over a piece of black paper to make sure I hadn't missed any sections...


...and on a whim, took out my pan chalks and a cotton ball to give it a test run.


Then it was time to head over to Wendy's for further experimentation!  She had seen a video on using stencils with royal icing, which specified that the icing should be the consistency of mayonnaise.  She tried out the stencil on her Silpat mat with mayonnaise and pink food coloring.  Voila!


Encouraged by success, I cut and pasted elements of the mandala for a stencil to use on the sides of the cake.  We ended up not using it after all.


Though next time we'd make it a bit stiffer, the apricot-tinted royal icing was quite striking over the chocolate fondant, and Wendy added some touches of gold dust to dress it up a bit.  I made a little matching card to go with it (but forgot to take a picture of it).


The Birthday Girl was glowing and gorgeous!

Stationery Portfolio - Tutorial


In my never-ending quest to find excuses to spend time at the calligraphy table,  a few years ago I came up with the idea of making monogrammed stationery for my friends and colleagues for the holidays.  The monograms are sketched quite large in pencil, then scanned and cleaned up in Photoshop Elements.  Here are a couple of samples:


I bought paper (and matching envelopes) with a semi-gloss finish and after cutting it to size, ran it through my inkjet.  Because of the surface, the ink was still wet as each page came out, so there was time to sprinkle it with clear embossing powder made for use with rubber stamps.  After tapping each to remove the extra powder, I set them all aside and then zapped them one-by-one with the heat gun, creating a raised surface over the printed monogram.


Presto!  Home thermography.

I added a blind-embossed oval by hand and scored the notes at the fold.  


The folios are cut from old Cavallini calendar pages with a template I designed (you could take apart and trace an old stationery folio for this).  


The folds are scored, then glued and clipped in place to dry.


Then the notes and envelopes are loaded inside...


...and the folios are finished off with paper strips and embellished with sealing wax.


Add a tag and you don't even need to giftwrap. 


Personalized, thermographed sets of stationery for little more than the cost of the paper!

Graduation, Illuminated: Diploma Tutorial

One of my first projects after taking an awesome illumination class with Bill Kemp at Castle in the Air in Berkeley back in 2004 was to design a diploma for my son's eighth grade graduating class at Marin Waldorf School. Since there were only nine graduates that year, I was able to hand paint each of diploma after printing the basic wording and design on my inkjet and inscribing each student's name. The illumination design here is Bill's from the class; I just changed a "W" to an "M".

Word got around, and the next year's class requested a diploma, but I didn't have time to paint them all myself--so I decided to enlist the help of the parents by giving a mini-class in illumination around my kitchen counter.

The end result:


Now it has become an (almost) annual tradition for the parents to gather--often while the class is on its eighth-grade trip--and sometimes they "do it up" with a potluck dinner as well. Groups have ranged from four to about twenty. Each parent paints his/her own child's diploma; if a parent can't attend, usually someone in the group will take on an extra one. It's a bittersweet time for these families who have devoted so much of themselves to the school, and who are preparing for their not-so-little ones to begin the high school adventure.

Although I do reuse some elements (usually cutting and pasting digitally), I try to make each year's diploma unique. For Marin Waldorf School, I'm always on the lookout for versions of the letter "M" that will work in this context.

Here is what we start with, printed on diploma parchment or any kind of nice heavy-ish paper that is smooth enough for me to calligraph the name, and sturdy enough to hold up to the gouache with which we will paint it:

Before meeting with the parents, I inscribe each student's name and cover it thoroughly with post-its to protect it during the painting process.

I prepare a bookmark-sized color key, and copy one for each painter/parent. I like to use pencil because it shows the shadings better, and doesn't "give away" the full effect of the deep-toned gouaches.

Provided for each participant:
  • palette
  • size 00 or 0 brush
  • black gel pen
  • water cup
  • cardboard cushion
Shared among the group:
  • gouache in red, blue, green, and purple
  • Windsor-Newton gold ink
  • several burnishing tools (bone folders or backs of spoons will work too)
  • several embossing tools
We start by painting the gold background for the illuminated letter. Each coat, as it dries, is burnished. It usually takes about three coats, burnished after each one, until the gold looks opaque. The gold is then "tooled", or debossed, in traditional designs. Next we paint the colors in gouache, following the key card (or not--always a rogue in the group!). Shading is added in slightly deeper tones, and finally everything is outlined carefully in black with a fine point gel pen to set if off and define the design.

This was a large group, so we used a school classroom. Great concentration!


And the final product:

Here is the most recent edition (sorry for the camera phone photo):


The finishing touch is a diploma cover, which can be purchased for under $5 each. For a few more cents you can even add a tassel! The diplomas are then taken to the appropriate "authorities" to be signed and made official.

It is important to stress that this is about a four-hour process, and because of the specialized tools, materials and instruction involved, is not a take-home project. It's not always easy for busy parents to set aside this much time! But well worth it.

Have Tag Will Travel (Tutorial)


A nice sturdy luggage tag is a big help when you’re trying to recognize your suitcase among all the others. It’s essential if your luggage is lost or misplaced, but it’s not a good idea to have your address readily visible. These tags proclaim the owner loud and clear, but keep contact information tucked inside yet accessible when needed.

Luggage tags were my go-to holiday gift this past season, and people really seemed to like them and want to know how to make them, so here they are.

Materials & Tools

  • black (or any deep color) paper, not too heavy, cut 3” X 10½”
  • x-acto knife and cutting mat
  • ruler
  • pen and white ink or gouache (I used Dr. Ph. Martin's Bleedproof White)
  • ¼” hole punch
  • blank white stickers, approximately 2 ¼ “ X 3 ¼ “ (I used Staples name badge labels)
  • ¼ “ (6 mm) eyelet kit (I used Dritz from Jo-Ann Fabrics)
  • hammer
  • sticky-backed Velcro dots (found these at Jo-Ann’s and at FedEx Office). Alternatively, you can purchase larger pieces and cut them to size, as long as they’re self-adhesive.
  • plastic loops for luggage tags known as “worms” [at office stores they usually come in packs of 25 along with laminating pouches (pouches are too small for this project), but they also are available separately in packs of 100 online at http://stores.ebay.com/Pouch-and-Coil__W0QQ_sidZ3406767?_nkw=worm&submit=Search]
  1. Lightly pencil in vertical dotted lines to define writing area. These lines will also be scored after laminating. Do not fold yet!
  2. Calligraph name in glorious Spencerian, slightly to the right in the space to leave room for the eyelet.
  3. Take to office store, (i.e. Staples or FedEx Office) and have laminated with 5 mil film. Three mil would also work but 10 is too thick to fold.
  4. Trim lamination close to paper all around, leaving about 1/16” to 1/8” of film. Optionally, trim corners (I use a corner punch for this).
  5. Score firmly along penciled lines on front (side where name is written).
  6. Fold shorter (2 ½”) side toward back and punch hole as shown through two layers.
  7. Place sticker on back of tag directly opposite name inscription. It will be on the inside of the luggage tag.
  8. Insert eyelet through both holes so that it holds the fold in place. (You may need to widen the hole a little by pushing a pen or pencil through it.) Use tools (“anvils”) that come with eyelets and secure with hammer.
  9. Fold longer (3 ½”) side and tuck under shorter side. It will probably stay in place as is, but will be more securewith Velcro dots attached.
  10. Loop “worm” through eyelet as shown.

Spreading a Little Sunshine (Tutorial)


Our dear neighbor Virginia had some surgery recently and was feeling under the weather, and the weather has been gloomy enough for weeks. So I decided to make a card she could enjoy while she recuperates, using a simple format so it would stand up on her table. These used to be available for purchase blank, with the cuts and scoring for folds all done, but I haven't seen them for years. Luckily, before I used my last one, I had made a template with those sheets of gridded plastic quilters use.


I wrote a simple message to her on the middle part in my best Spencerian, with walnut ink with gold details on the flourishes...


...then made the simple cuts and scored the folds for fitting it together.


I added a dab of sealing wax, tied it with twine and tucked it into pretty orchid from the farmers' market. Hope it brought her a little cheer!

Here's a drawing of the template, with all the measurements.
Or, you could just copy this and enlarge it--in theory it will work at any size. I've marked the cuts and the outside folds; the rest of the folds fall midway between the cuts. [Note: It might look as if you could use the piece you've cut from the middle of the frame for the other part, but you can't. It needs to be a little larger.]
Have fun with this !